使用 WireGuard 内网穿透,实现在外面手机卡上网的手机,以公网机充当中转机,对家庭中非公网的内网设备进行访问。
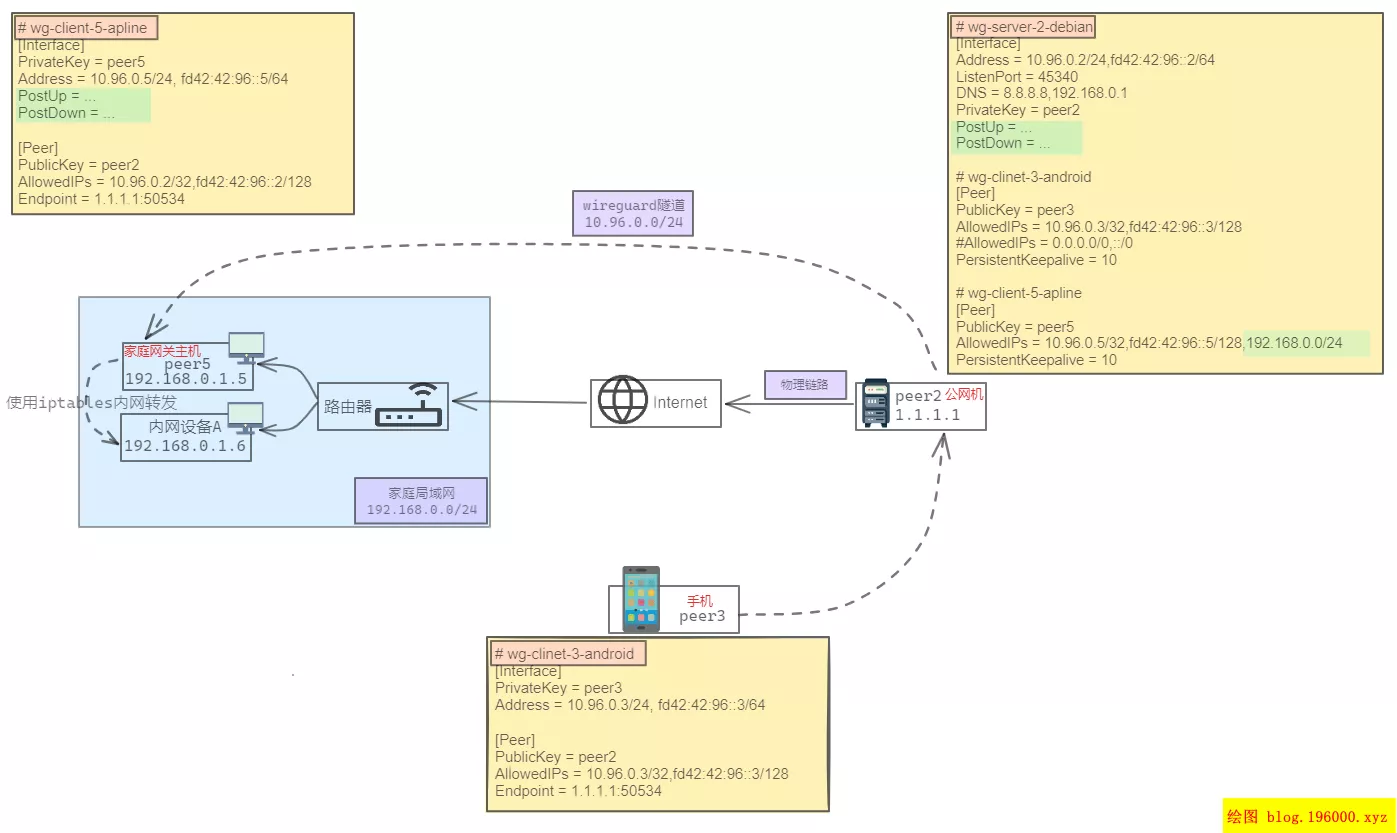
如结构图:
- 手机端(下文统称为“
手机”)在外面使用中国移动上网 - 家庭网络中,家庭网关主机(下文统称为“
家庭网关主机”)可以互联网访问,其它为内部设备,只能局域网访问 - 家庭局域网 IP 段为
192.168.0.0/24 - 公网机(下文统称为“
公网机”)公网 IP 为1.1.1.1 - WireGuard 的隧道内网 IP 网段为
10.96.0.0/24 - 实现手机跟家庭网关主机一样,访问家庭网络内部设备,例如手机访问“内网设备A”的 Web
http://192.168.0.6,服务可用
此外,建立 WireGuard 隧道组建局域网外,手机端网络是公网代理上网的,如果公网机网络自带科学,手机也能科学上网的。
结构图

配置步骤
- 公网机 + 家庭网关主机,开启 Linux 内核的 IP 包转发,
echo "net.ipv4.ip_forward = 1" >> /etc/sysctl.conf - 手机 + 公网机 + 家庭网关主机,三者安装 WireGuard 并配置
- 公网机添加路由转发,注意 AllowedIPs 需要添加家庭局域网内网 IP 段
- 家庭网关主机添加路由转发,注意与步骤 3 中 wg 和 eth0 流量方向的不同
注意:公网机使用 ufw 管理防火墙,除了配置文件 PostUp 添加 iptables 转发脚本外,ufw 也需要额外添加开启路由转发功能配置。
具体配置
- 开启 Linux 内核的 IP 包转发
临时开启 sysctl -w net.ipv4.ip_forward=1
永久生效 echo "net.ipv4.ip_forward = 1" >> /etc/sysctl.conf && sysctl -p
- 安装 WireGuard
目前 WireGuard 已经被合并到 Linux 5.6 内核中,如果你的内核版本 >= 5.6,就可以用上原生的 WireGuard,只需要安装 wireguard-tools 即可,内核版本 <5.6,可能需要首先更新内核,否则可能会报错:Unable to access interface: Protocol not supported 错误。
# 查看当前内核版本
root@cloudcone-la01:~# uname --kernel-release
5.10.0-26-amd64
安装完可验证 WireGuard 是否正确安装,检查模块的状态并确保 WireGuard 工具可用即可:
# Verify the WireGuard module is loaded
lsmod | grep wireguard
# Check if WireGuard tools are installed
wg --version
Ubuntu / Debian
适用于 Ubuntu(使用内核 5.4 或更高版本)。使用早于 Debian 11 (Bullseye) 的 Debian 版本的用户应首先启用向后移植。然后安装 openresolv 和 wireguard
apt update && apt install openresolv wireguard
# 或者用 resolvconf
Fedora
适用于 Fedora 32 及更高版本(使用内核 5.6 或更高版本)。
dnf install wireguard-toolsdebian11 安装 wireguard
# debian11 安装 wireguard
# 我的 debian11 信息如下,自测安装成功
root@cloudcone-la01:~# uname -a
Linux cloudcone-la01 5.10.0-26-amd64 #1 SMP Debian 5.10.197-1 (2023-09-29) x86_64 GNU/Linux
root@cloudcone-la01:~# cat /proc/version
Linux version 5.10.0-26-amd64 ([email protected]) (gcc-10 (Debian 10.2.1-6) 10.2.1 20210110, GNU ld (GNU Binutils for Debian) 2.35.2) #1 SMP Debian 5.10.197-1 (2023-09-29)
# Install
apt update
apt install wireguard
wg genkey | tee server.privatekey | wg pubkey > server.publickey
# Configure
vi /etc/wireguard/wg0.conf
alpine 安装 wireguard
# alpine 安装 wireguard
# 我的 alpine 信息如下,自测安装成功
~ # uname -a
Linux alpine318-gateway 6.2.11-2-pve #1 SMP PREEMPT_DYNAMIC PVE 6.2.11-2 (2023-05-10T09:13Z) x86_64 Linux
~ # cat /proc/version
Linux version 6.2.11-2-pve (build@proxmox) (gcc (Debian 10.2.1-6) 10.2.1 20210110, GNU ld (GNU Binutils for Debian) 2.35.2) #1 SMP PREEMPT_DYNAMIC PVE 6.2.11-2 (2023-05-10T09:13Z)
# Configure a Wireguard interface (wg)
# https://wiki.alpinelinux.org/wiki/Configure_a_Wireguard_interface_(wg)
apk add wireguard-tools-wg-quick
apk add iptables
apk add sysctl
wg genkey | tee server.privatekey | wg pubkey > server.publickey
# Enable IP Forwarding
net.ipv4.ip_forward = 1
rc-update add sysctl
sysctl -a | grep ip_forward
# Configure
vi /etc/wireguard/wg0.conf
其他 Linux 发行版,请按照官方安装说明进行操作。
- ufw 防火墙设置
公网机使用了 ufw 管理防火墙,开始的时候以为配置文件 PostUp 对 iptables 开启了流量转发就可,实测不成功,需要在 ufw 也要添加相关的设置。
# 1. 更改默认策略
vi /etc/default/ufw
# 将 forward 更改为 ACCEPT
DEFAULT_FORWARD_POLICY="ACCEPT"
# 2. 添加 nat 转发
vi /etc/ufw/before.rules

# nat Table rules
*nat
:PREROUTING ACCEPT [0:0]
:POSTROUTING ACCEPT [0:0]
COMMIT

# Don't delete these required lines, otherwise there will be errors
# *filter
# :ufw-before-input - [0:0]
# ......
# ......
# don't delete the 'COMMIT' line or these rules won't be processed
COMMIT

# 注意代码添加的位置是在文件头部而非末尾的 COMMIT 前添加,即添加后整个配置文件有两个 COMMIT 的,不然启动 ufw 会报错
# ERROR: problem running ufw-init
# Bad argument `*nat'
# Error occurred at line: 76
# Try `iptables-restore -h' or 'iptables-restore --help' for more information.

# 3. 开发配置文件中指定的监听端口
ufw allow 50534  # wireguard

# 4. 重启 ufw 使生效
ufw disable && ufw enable- 启动及维护的命令
# /etc/wireguard/wg0.conf
# wg-quick up wg0
# wg-quick down wg0
# /etc/init.d/wg-quick-wg0 start
# ping 10.96.0.2
# wg show

# alpine 开机启动
cat > /etc/init.d/wg-quick-wg0 <<-'EOF'
#!/sbin/openrc-run
description="wg-quick wg0"
depend() {
    need net
    need localmount
}
start() {
    wg-quick up wg0
}
stop() {
    wg-quick down wg0
}
EOF

chmod a+x /etc/init.d/wg-quick-wg0
rc-update add wg-quick-wg0 default
/etc/init.d/wg-quick-wg0 start

# debian 开机启动
cat > /etc/rc.local <<-'EOF'
#!/bin/bash
wg-quick up wg1
wg-quick up wg0
EOF

systemctl enable rc-local  # 启用
systemctl start rc-local.service # 开始运行
systemctl status rc-local.service  # 查看状态
cat /lib/systemd/system/rc-local.service
完整的配置文件
公网机
root@cloudcone-la01:~# cat /etc/wireguard/wg0.conf
[Interface]
Address = 10.96.0.2/24,fd42:42:96::2/64
ListenPort = 50534
DNS = 8.8.8.8,192.168.0.1
PrivateKey = sCryGGH2R1hpMf+uAqG8VI/CDSXrXZevBsczFj+jRU8=
PostUp =  echo 1 > /proc/sys/net/ipv4/ip_forward; iptables -A FORWARD -i %i -j ACCEPT; iptables -t nat -A POSTROUTING -o %i -j MASQUERADE; iptables -A FORWARD -o %i -j ACCEPT
PostDown = echo 0 > /proc/sys/net/ipv4/ip_forward; iptables -D FORWARD -i %i -j ACCEPT; iptables -t nat -D POSTROUTING -o %i -j MASQUERADE; iptables -D FORWARD -o %i -j ACCEPT
PostUp = echo 1 > /proc/sys/net/ipv4/ip_forward; ip6tables -A FORWARD -i %i -j ACCEPT; ip6tables -t nat -A POSTROUTING -o %i -j MASQUERADE; ip6tables -A FORWARD -o %i -j ACCEPT
PostDown = echo 0 > /proc/sys/net/ipv4/ip_forward; ip6tables -D FORWARD -i %i -j ACCEPT; ip6tables -t nat -D POSTROUTING -o %i -j MASQUERADE; ip6tables -D FORWARD -o %i -j ACCEPT

# wg-clinet-3-android
[Peer]
PublicKey = 76IO2GHAnSVM8XRsII9o+LUJjGnKHAcIhanby0hNIEI=
AllowedIPs = 10.96.0.3/32,fd42:42:96::3/128
#AllowedIPs = 0.0.0.0/0,::/0
PersistentKeepalive = 10

# wg-client-5-apline
[Peer]
PublicKey = SHCkPqjK36KgFE/YXkpTQaV94ODhti5nWNCbyT7LnXw=
AllowedIPs = 10.96.0.5/32,fd42:42:96::5/128,192.168.0.0/24
PersistentKeepalive = 10
家庭网关主机
~ # cat /etc/wireguard/wg0.conf
[Interface]
PrivateKey = AP9zsaDy/Q1q8MG/avlZ2SD3aKSol1wNT3XZhrzoYXo=
Address = 10.96.0.5/24, fd42:42:96::5/64
PostUp = echo 1 > /proc/sys/net/ipv4/ip_forward; iptables -A FORWARD -i %i -j ACCEPT; iptables -t nat -A POSTROUTING -o eth0 -j MASQUERADE; iptables -A FORWARD -o %i -j ACCEPT
PostDown = echo 0 > /proc/sys/net/ipv4/ip_forward; iptables -D FORWARD -i %i -j ACCEPT; iptables -t nat -D POSTROUTING -o eth0 -j MASQUERADE; iptables -D FORWARD -o %i -j ACCEPT
PostUp = echo 1 > /proc/sys/net/ipv4/ip_forward; ip6tables -A FORWARD -i %i -j ACCEPT; ip6tables -t nat -A POSTROUTING -o eth0 -j MASQUERADE; ip6tables -A FORWARD -o %i -j ACCEPT
PostDown = echo 0 > /proc/sys/net/ipv4/ip_forward; ip6tables -D FORWARD -i %i -j ACCEPT; ip6tables -t nat -D POSTROUTING -o eth0 -j MASQUERADE; ip6tables -D FORWARD -o %i -j ACCEPT

[Peer]
PublicKey = 6JRBT9rCQGcx+xqS7ShqE09+rS2icwW7J0gOKwvJ1EU=
AllowedIPs = 10.96.0.2/32,fd42:42:96::2/128
Endpoint = 1.1.1.1:50534
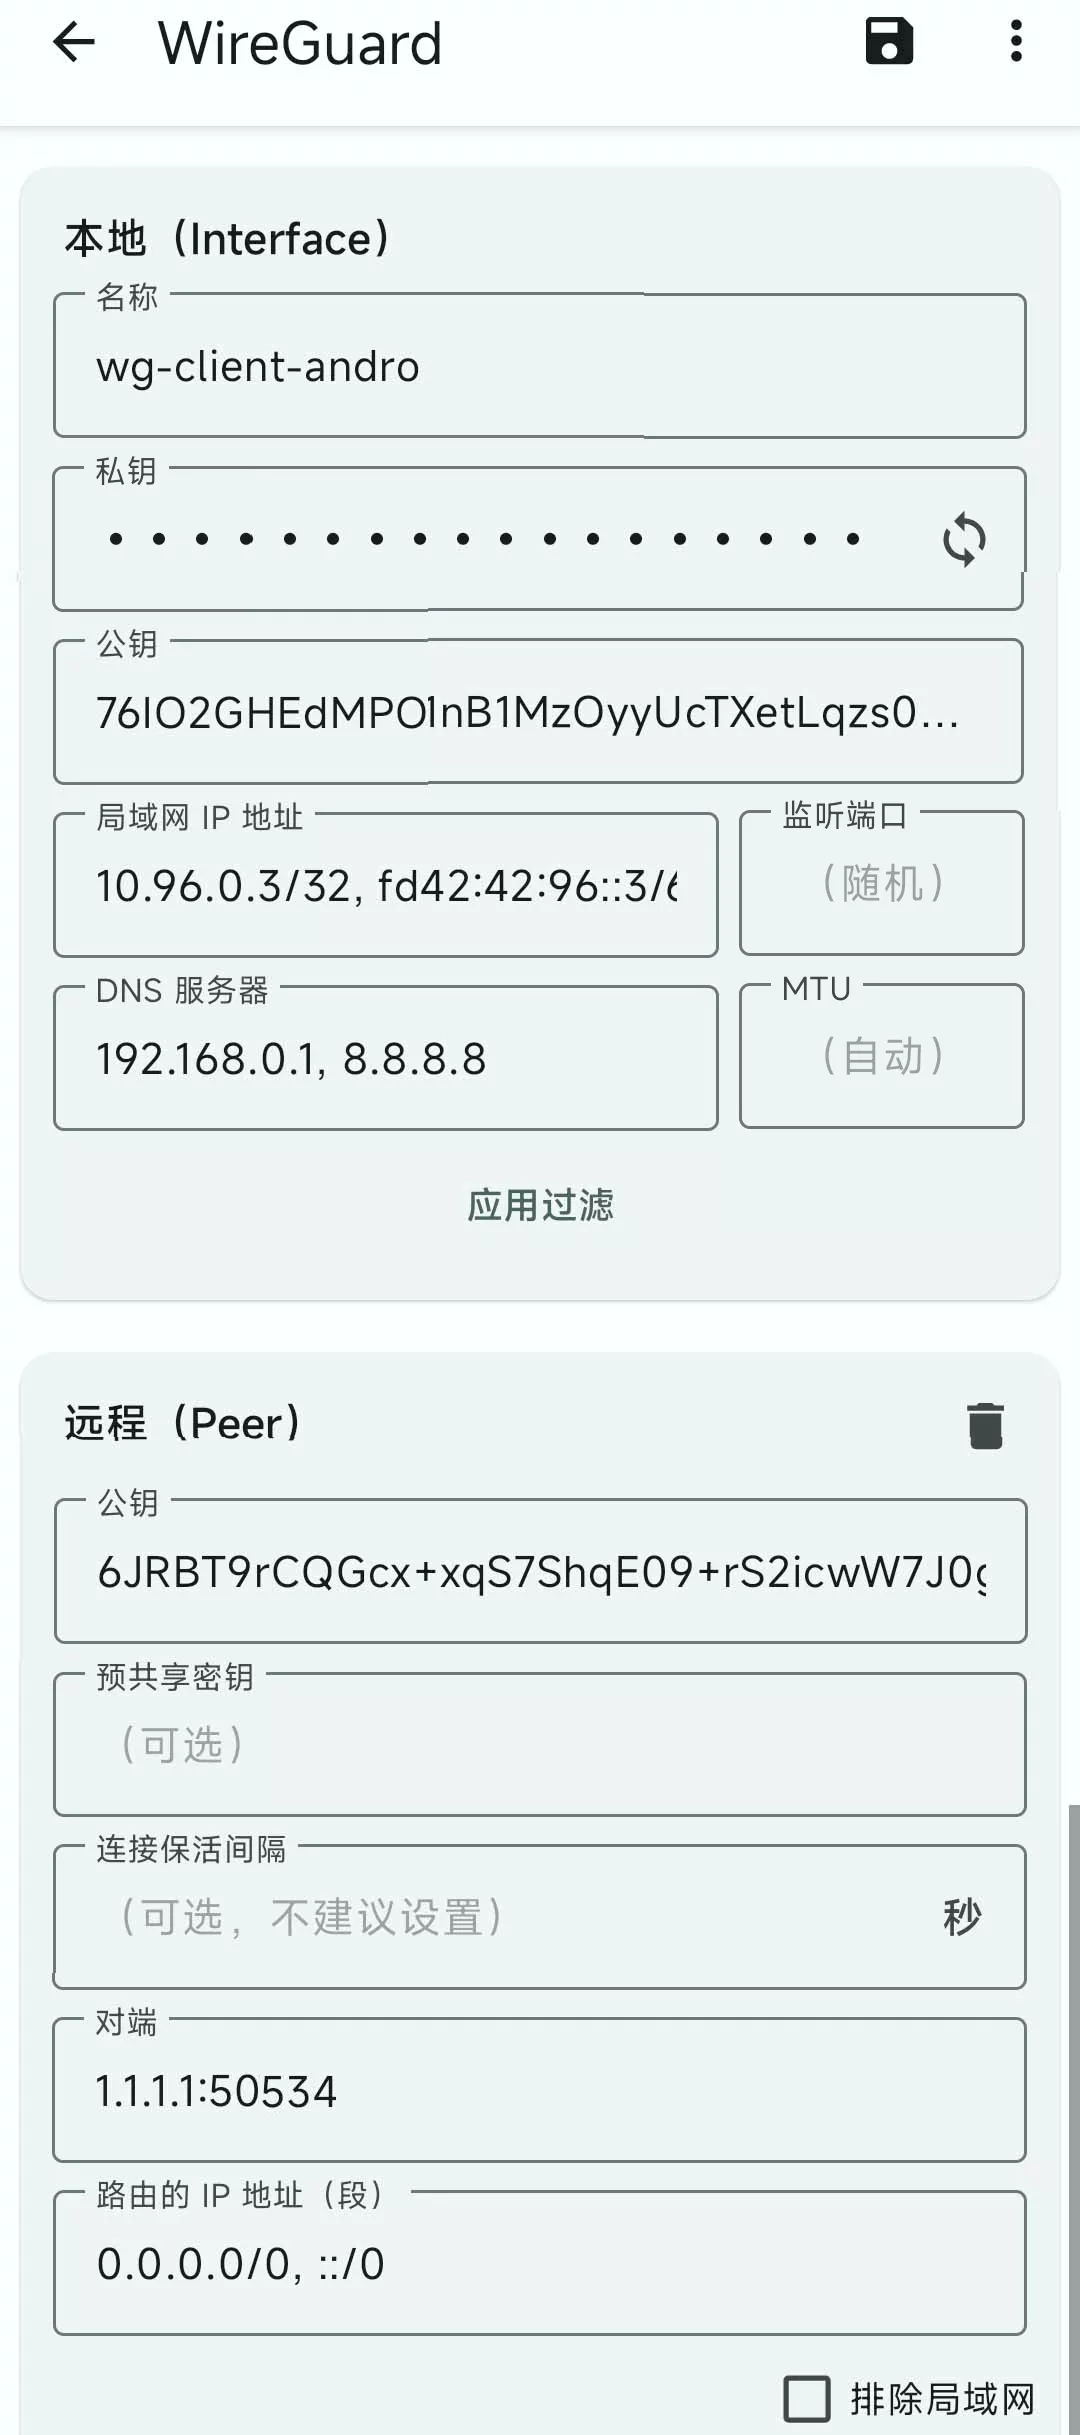
手机

问题与解决
在 wiregaurd 中,节点之间是不区分服务端与客户端的,统一概念为 peer。谁发起连接谁就是客户端,因此客户端需要配置 endpoint。?
教科书如上说,实际测试如下:
服务端要连接客户端,要先在客户端主动连接服务端接通隧道建立后,服务端才能与客户端通行,因为需要由客户端根据 endpoint 进行隧道建立。
# 问题描述
# 1. 公网机发 ping 包给家庭网关主机,提示 Destination Host Unreachable(不通)
# 2. 此时家庭网关主机主动连接到公网机,隧道建立后,此时公网机就不会再是 Destination Host Unreachable
# 完整经过
# 3.1 公网机 ping 家庭网关主机(不通)
root@cloudcone-la01:~# ping 10.96.0.5
PING 10.96.0.5 (10.96.0.5) 56(84) bytes of data.
From 10.96.0.2 icmp_seq=1 Destination Host Unreachable
ping: sendmsg: Destination address required
From 10.96.0.2 icmp_seq=2 Destination Host Unreachable
# ...
# 3.2 家庭网关主机主动连接公网机,隧道建立后
# ~ # ping 10.96.0.2
# PING 10.96.0.2 (10.96.0.2): 56 data bytes
# 64 bytes from 10.96.0.2: seq=0 ttl=64 time=426.884 ms
# 64 bytes from 10.96.0.2: seq=1 ttl=64 time=212.471 ms
# 3.2 此时,公网机 ping 已也通
64 bytes from 10.96.0.5: icmp_seq=1 ttl=64 time=198 ms
64 bytes from 10.96.0.5: icmp_seq=2 ttl=64 time=206 ms
解决:
家庭网关主机轮询公网机保持一直接通状态,crontab -e 增加:
*/3 * * * * ping 10.96.0.2 >> /dev/null 2>&1